CAPTCHAs
A CAPTCHA is a validation layer that identifies the type of user before delivering data to the server.
Advantages of CAPTCHAs
There are numerous ways to send automated messages. If you do not employ a CAPTCHA on your feedback or user registration page, you will receive a lot of spam messages or users.
So, the primary benefit of CAPTCHA is to prevent spam messages or users.
How to use CAPTCHA in ASP.NET MVC
There are numerous open-source libraries available to accomplish this. Although you can develop your own code to integrate a CAPTCHA in your application, this is entirely up to you.
Step 1
Create the Empty ASP.NET MVC application.
Step 2
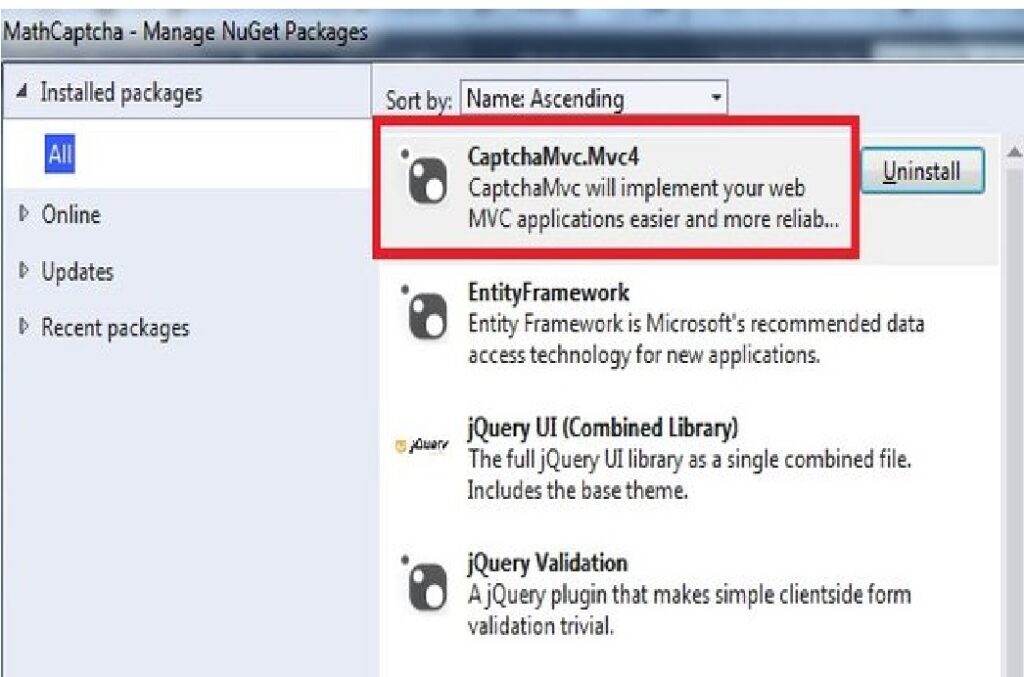
Add the CaptchaMvc library to the Reference Layer like this.

Step 3
In the Model layer add a demo_Feedback class and create the property like this.
- namespace demo_MathCaptcha.Models
- {
- public class Feedback
- {
- public int Id { get; set; }
- public string Title { get; set; }
- public string Comment { get; set; }
- }
- }
Step 4
Create a HomeController and write the action method like this.
using System.Web.Mvc;
using CaptchaMvc.HtmlHelpers;
namespace demo_MathCaptcha.Controllers
{
public class HomeController : Controller
{
public ActionResult Index()
{
return View();
}
[HttpPost]
public ActionResult Index(string empty)
{
// Code for validating the CAPTCHA
if (this.IsCaptchaValid(“Captcha is not valid”))
{
return RedirectToAction(“ThankYouPage”);
}
ViewBag.ErrMessage = “Error: captcha is not valid.”;
return View();
}
public ActionResult ThankYouPage()
{
return View();
}
}
}
Pointe to be Noted: Do not forget to use the CAPTCHA MVC.HtmlHelpers namespace. In the post action method I wrote code for CAPTCHA validation.
Step 5
Now create the Index View like this.
@using CaptchaMvc.HtmlHelpers
@using MathCaptcha;
@using CaptchaMvc;
@model demo_MathCaptcha.Models.Feedback
@{
ViewBag.Title = “Index”;
}
@using (Html.BeginForm()) {
@Html.ValidationSummary(true)
<fieldset>
<legend>Feedback</legend>
<div class=”editor-label”>
@Html.LabelFor(model => model.Title)
</div>
<div class=”editor-field”>
@Html.EditorFor(model => model.Title)
@Html.ValidationMessageFor(model => model.Title)
</div>
<div class=”editor-label”>
@Html.LabelFor(model => model.Comment)
</div>
<div class=”editor-field”>
@Html.TextAreaFor(model => model.Comment,5,40,null)
@Html.ValidationMessageFor(model => model.Comment)
</div>
@Html.MathCaptcha()
@*@Html.Captcha(3)*@
<br />
<p class=”Error”> @ViewBag.ErrMessage </p>
<p>
<input type=”submit” value=”Send” />
</p>
</fieldset>
}
Impotant Note: Here if you use the @Html.MathCaptcha() helper class then it will generate a mathmatical CAPTCHA. If you use the @Html. Captcha(3) helper class then it will generate a Char CAPTCHA. 3 is the length of the CAPTCHA.
Step 6: Create the ThankYouPage index like this.
- @model demo_MathCaptcha.Models.Feedback
- @{
- ViewBag.Title = “ThankYou Captcha”;
- }
- <h2>ThankYouPage</h2>
- <b> Thank you sending your valuable feedback to us.</b>
Remember:
- Just include the CaptchaMvc libray.
- Use the CaptchaMvc.HtmlHelpers namespace.
- Use the MathCaptcha namespace for using mathCaptcha.
- Use the CaptchaMvc namespace for using CharCaptcha.
- For a math CAPTCHA use the @Html.MathCaptcha() helper class.
- For a Char CAPTCHA use the @Html.Captcha(3) helper class.
Conclusion:
We demonstrated how to use a CAPTCHA in an ASP.NET MVC application. It is quite simple and straightforward to implement in MVC apps.


